This guide offers a straightforward approach to managing and allocating unallocated funds within the CRM, ensuring that users can efficiently track and apply funds to outstanding invoices. By following the outlined steps, users can easily navigate to the unallocated funds section, select the appropriate invoices, and allocate funds either individually or in bulk. This process not only aids in maintaining accurate financial records but also enhances cash flow management by ensuring that all received funds are appropriately assigned.
Tip: What Are Unallocated Funds?
Unallocated funds are payments brought into the CRM against either a Property or a person e.g. Tenant and NOT allocated to an invoice e.g. Rent.
If funds are brought into CRM via a Bank Receipt but not allocated to an invoice, they will be stored on the CRM as unallocated funds against the person or property they where paid in by (Tenant) or To (Landlord/Property).
Alert: Alert! Any Unallocated funds paid in by a Landlord are stored against the property record they where paid in for. If Perform Payments is run before the unallocated balance is set against an invoice (or transferred e.g. to a float) the money will be paid straight back to the Landlord
Unallocated Funds
1. Navigate to https://crm.iamproperty.com/MyDay
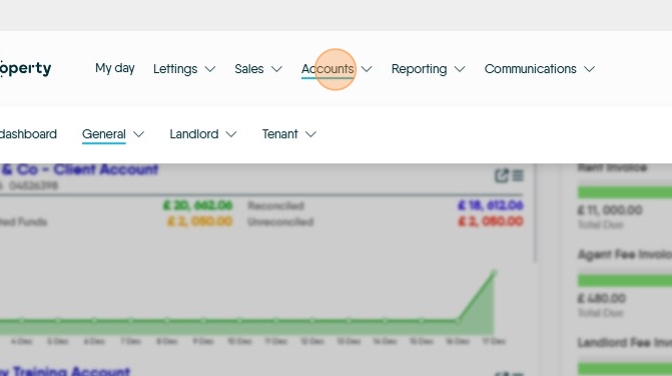
2. Click "Accounts"

3. Click "General"

4. Click "Unallocated"

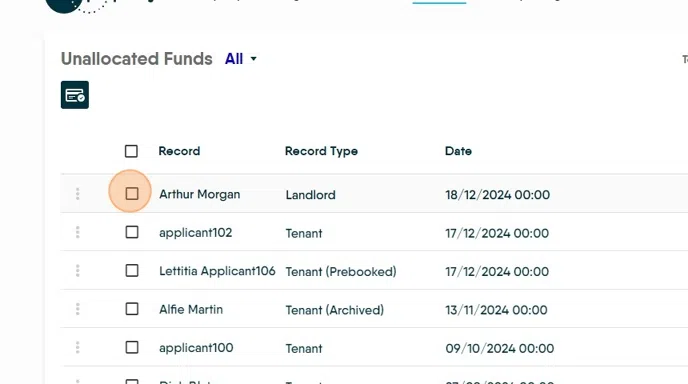
5. The screen shows the record and record type of unallocated funds in all accounts.

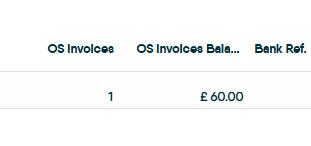
6. It also shows the number and balance of outstanding (OS) invoices.
7. Click on the menu next to the funds you want to allocate and click "Allocate"

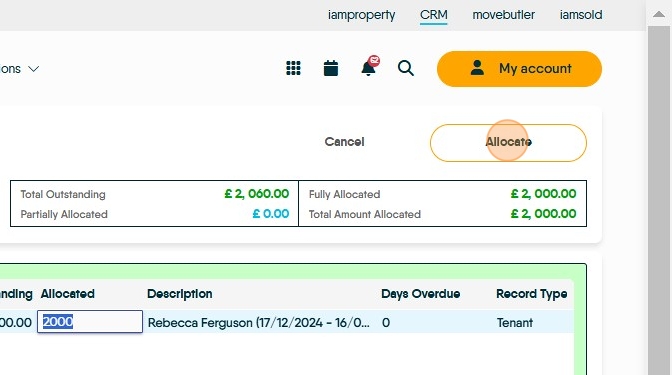
8. Click the checkbox next to the invoice/s to which you wish to allocate the funds, or use the checkbox in the column headings to select all. If you bulk allocate transactions, this will allocate against the oldest invoice first.
In the 'Allocate' column enter the amount you are allocating, from the total unallocated funds, to that invoice. Continue until all of the funds are used or invoices paid.
You don't need to pay the full invoice amount

9. Click "Allocate" This will then allocate the available funds against the invoices selected.

Auto Allocate
Tip: Tip! Auto Allocate allows multiple records to be selected and then the CRM will allocate the funds to an invoice to pay the oldest invoice first.
10. Select all the records you want to allocate funds to. Either individually, as here, or by selecting the box at the top of the column to select all the entries.
Click this checkbox.
11. Click the 'Auto Allocate' option. You will see a progress box as the transactions are completed.

Bank Allocation Screen
Tip: Tip! You can also allocate funds on an individual basis from the bank account.
12. Click "Accounts"
13. Click "Accounts dashboard"

14. Click the 3-line menu next to the appropriate account.

15. Click "Allocate"

16. On the left-hand side, you will see each unallocated transaction. On the right-hand-side, you will see any outstanding invoices for that record. Click the checkbox next to the invoice/s to which you wish to allocate the funds.

17. To part-allocate to an invoice, simply overtype the amount and the balance will remain on the CRM as an outstanding invoice.

Tip: Tip! once the first record is completed move on to the second and subsequent records by scrolling down the screen.
18. Once happy, click "Allocate"