This guide provides a step-by-step process for adding a new sales viewing appointment in the CRM system, using the NEW Core Process Simplification method. By following these instructions, users can streamline their appointment setup, reduce errors, and enhance their productivity. It's an essential resource for anyone looking to optimise their use of the CRM platform and improve client interactions. Viewing this guide will empower users to navigate the system with confidence and ease.
1. Navigate to https://crm.iamproperty.com/MyDay

Tip: There are 2 key places that a viewing record can be added from. These are the My Day screen and the Quick Access (aka Bento) menu. Once the option is selected the process from there on is identical.
From the My Day screen
3. Click "Add New Record"

From the 'Quick Access' menu
5. Click here

6. Click "Add new record"

7. Click "Lettings Viewing"

8. You will arrive at this screen.

9. If you are creating a viewing for an existing contact, click "Use existing record"

10. Complete all, or as much of the details for the primary applicant as you can.
If there more than 1 applicants, add the second applicant from the applicant record as a 'Linked Applicant' [[[Click here to see how]]](https://scribehow.com/viewer/Linking_Applicants_in_CRM__1kYZYdDZSyG1EqgrSnM06g?referrer=search)

11. If the applicant only has a mobile phone number, add this to both the 'Mobile phone' and 'Phone number' fields.

12. Click the "Enter a full postcode" field and add the applicants address.

13. Click "Continue"

14. Click the "Search for a property" field and add the postcode details for the property the viewing is to be booked for. Select the address from the drop down menu

15. Click "Continue"

16. If any of the entries need to be edited, click on the 'pencil' icon (highlighted)

17. Click "Assignee(s)" and assign the viewing to one of your team.
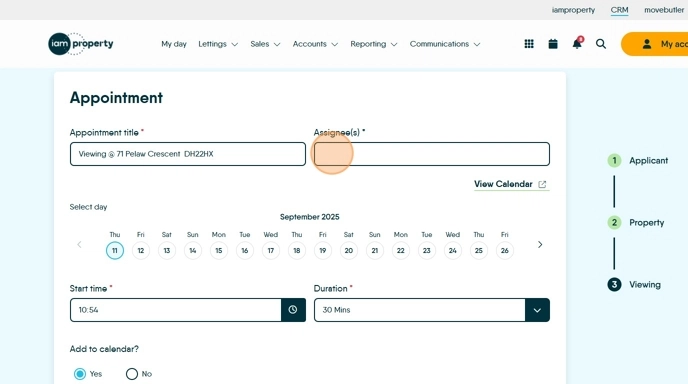
18. Click the date that you wish to create the viewing for.

19. Click the "Start time *" field.

20. Click "Duration" to set the length of the appointment, the default time is 30 mins.

21. At this point the CRM will check the calendar for any appointment conflicts, if any are found then the detail will show under the start time field, in the highlighted area.

22. Set if the appointment is to be added to the Calendar. Click "Yes" or "No" if the appointment is not added to the calendar, it will show in the Applicant and Property records ONLY. Otherwise, the appointment will show in all 3 areas (calendar, applicant and property).

23. If the appointment is "Confirmed?" Click "Yes" if the appointment is not confirmed it will show in the calendar in red and show in the 'Unconfirmed viewings' option in the Activity List.

24. Note if the appointment is 'Accompanied' and where you are meeting the viewer..
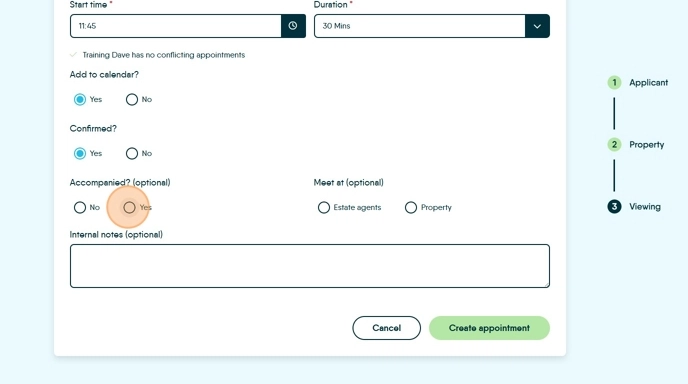
25. Click this field to add any notes about the viewing.

26. Click "Create appointment"
